10 Kick-Ass Tips to a BETTER Deadlift
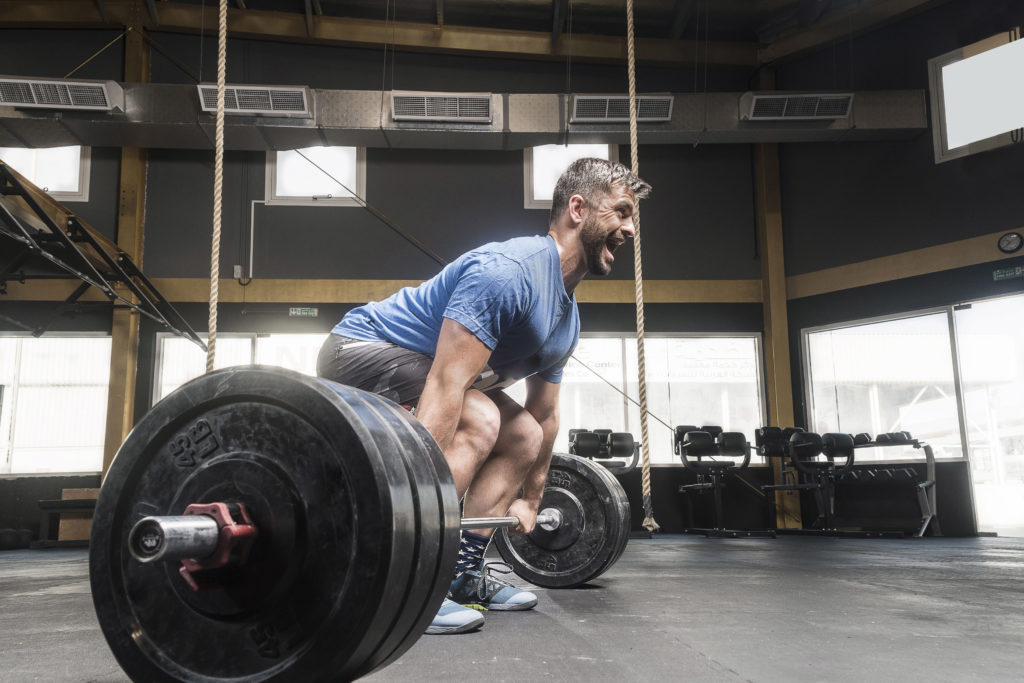
The Deadlift.
A lift that I thought I know how to perform five years ago, yet looking back, knew nothing about. And it’s part of the reason I threw my low back out.
After spending a few years with severe back issues and overcoming them – I worked back to deadlifting. But this time I made it my goal to learn as much as possible about this lift. And to make sure others don’t follow in my steps to a herniated disc.
Fast forward to today.
I can say after attending multiple weight training conferences, learning from professors, strength coaches, powerlifters, my journey back to deadlifting, and setting new PR’s – the deadlift is ONE of the MOST technical lifts. To give a few examples:
-You need adequate hip mobility to get down to the bar and set-up in a safe position.
-People need to know the difference between a neutral spine, flexed spine and extended spine.
-And people need to understand how footwear can affect technique on the deadlift.
These are a few examples, but they represent the technical demands of the deadlift. A failure to understand these demands is why so many people injure themselves when deadlifting.
Many people don’t know how to perform the deadlift with proper technique. Or are afraid to even attempt it because of the horror stories they’ve heard from people throwing their back out.
I’ll admit – it’s not a lift everyone should be performing, but people that can perform a deadlift and execute it with proper technique will notice several benefits that include:
- Posterior Chain (Glutes, Hamstrings, Low Back) Development
- Improvements in Strength (e.g., grip) and Power (e.g., vertical jump)
- Improvements in Posture (think people with kyphotic posture)
- Carryover to Everyday Lifting Activities
For today’s post – I want to share with you 10 things I’ve learned about the deadlift that I hope can help any novice or intermediate lifters improve their deadlift performance.
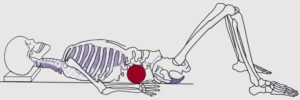
1. Go Barefoot or Minimalist
Using a shoe with a heel lift is not a good idea when it comes to deadlifting. The heel lift will shift your center of gravity forward and increase the distance your arms have to travel to the bar.
Going barefoot or using a minimalist shoe will prevent your center of gravity from shifting forward and eliminate any distance disadvantages the bar may have to travel.
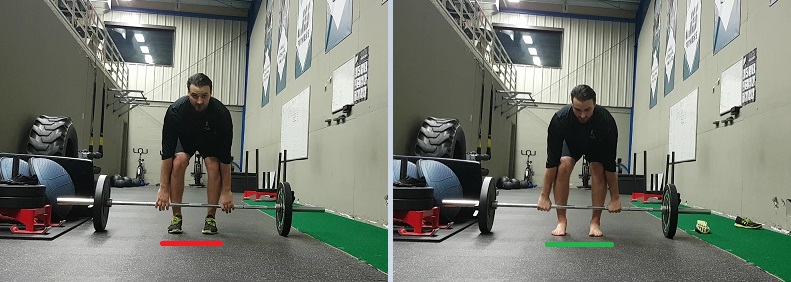
The above photo represents deadlifting with shoes (elevation) and without shoes (no elevation).
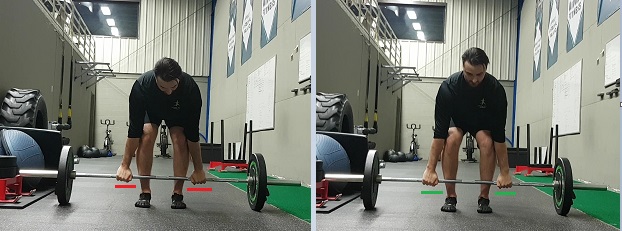
2. Grip the Floor Tight
An interesting tip I learned from Chris Duffin at SWIS 2016 is that when setting up for the deadlift – think about making a big foot and spreading your toes apart. By spreading your toes apart – you can grip the floor tight and add stability to your base.
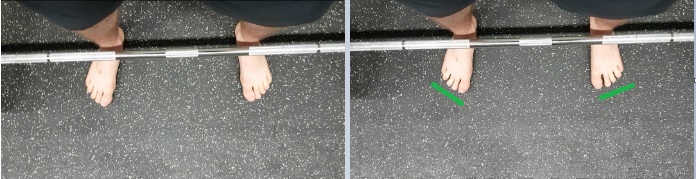
The above photo represents toes together (left) versus toes spread apart (right).
3. Don’t Round the Low Back
The number 1 reason people throw their low back out on a deadlift is that they lift with a rounded back. People who lift with a rounded back will not have a long deadlifting career as a herniated disc will develop. Keeping the low back neutral is critical to success.
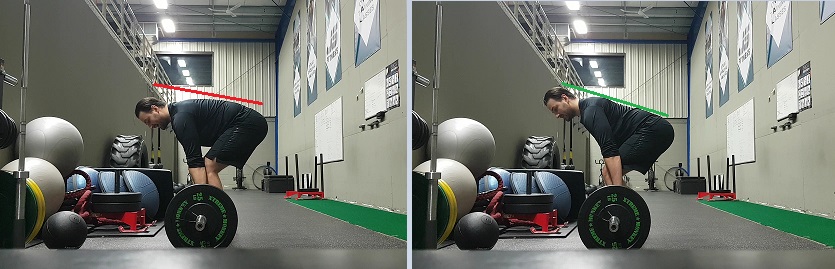
The above photo represents the spine rounding (left) and the spine neutral (right).
4. Don’t Hyperextend the Low Back at the Top
Another low back issue that may occur is when people hyperextend their low back at the top of the deadlift. People who hyperextend their low back at the top are only going to beat up on the posterior spine (e.g., facet joints) and create or aggravate an injury (e.g., pars fracture, osteoarthrosis).
5. Lock the Lats, and Stiffen Your Core
When setting up for a deadlift, you should be tight. And by tight – it should almost feel uncomfortable. Any looseness could cause a person to execute the lift with poor performance.
One way to prevent the low back from rounding is by anti-shrugging and locking the lats into the bar. By locking the lats into the bar – you’re eliminating any slack that may exist. After locking the lats – stiffen your triceps and keep your core tight.
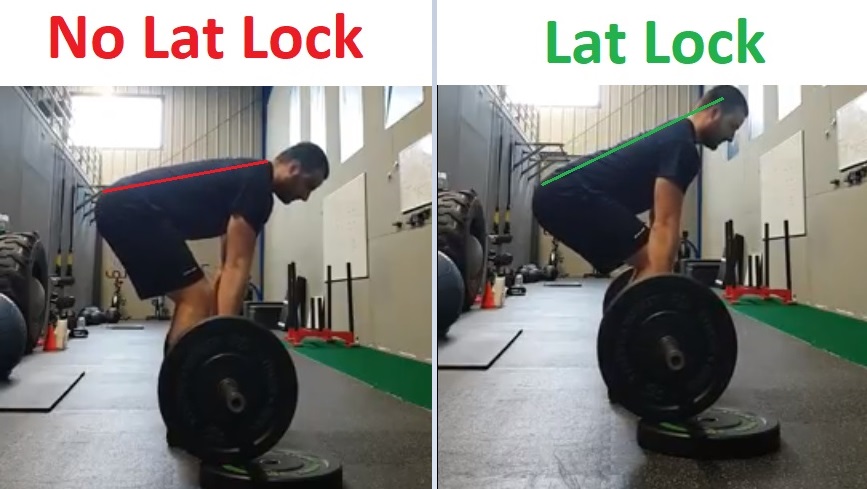
The above photo represents no lat lock (left) and lat lock (right).
6. Grip the Bar Tight
Pulling with a soft grip will get you nowhere. Stiffen your wrist, forearms, and grip the bar tight on your set-up.
The above photo represents a loose hand grip (left) and a tight hand grip (right).
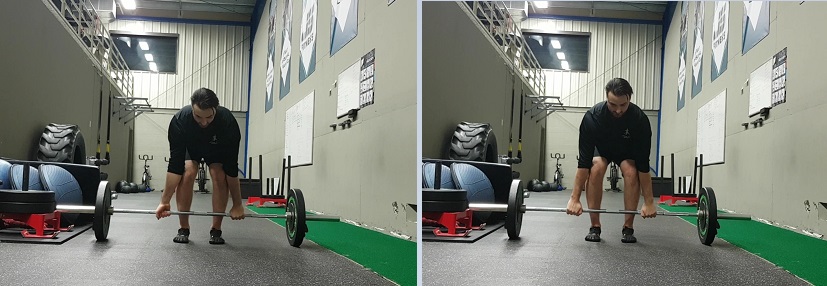
7. Don’t Bump the Bar
A common mistake people make is they bump the bar before initiating the deadlift. Bumping the bar – shifts the bar in front of the body – making it more difficult to pull (bar further away from the axis of rotation).
8. Use a Double Overhand Grip Unless You’re an Advanced Lifter
I heard Matt Wenning share this tip at SWIS 2016. Beginner or recreational lifters who choose to use a mixed grip are going to create imbalances in the upper back and shoulders if they don’t alternate their grip each rep or set. Also, using a mixed grip suggests a weakness in grip strength. Developing grip strength in a double overhand grip position should be a focus before moving to a mixed grip.
Unless you’re an advanced lifter and grip is becoming a limiting factor in the weight you pull – I suggest sticking with a double overhand grip.
The above photo represents a mixed hand grip (left) and double overhand grip (right).
9. Keep the Neck Neutral Unless You’re an Advanced Lifter
Similar to the previous tip about grip position on a deadlift – I feel similar about neck position. For a beginner or intermediate lifters – I would advocate for keeping a neutral cervical spine position. But if you’re a lifter competing – playing around with neck position (neutral, flexion, extension) when lifting may be a consideration for optimal performance.
Some of the greatest powerlifters have used a flexed (Konstantin Konstantinovs) or extended neck (Ed Coan) position when lifting. A flexed neck may create more neural tension, whereas an extended neck may stimulate more erector muscle activity. For more information on neck position – I’d suggest you check out the book Gift of Injury by Dr. Stuart McGill and Brian Carroll.
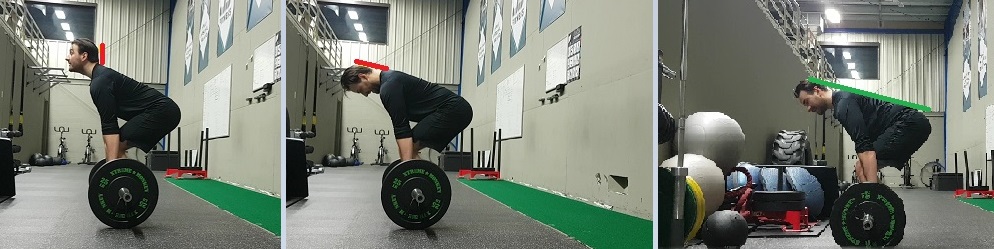
The above photo represents neck extension (left), neck flexion (middle) and neck neutral (right).
10. Add Cluster Sets to Your Training
The deadlift is one the most technical and demanding exercises. And it’s no surprise that people often injure themselves when deadlifting. When a lifter advances in their training, it’s hard to rep out heavy deadlifts.
Incorporating cluster sets is a great way to maximize rep range while maintaining technique. Cluster sets involve performing a repetition and taking a short break (10-15 seconds) afterwards before moving to the next rep. For example:
75% 1RM Deadlift 4 sets x 4 reps (Cluster Set – a 15-second break between each rep and then a 3-4 minute break following the set)
Final Thoughts
Every person is unique and will have a different approach to deadlifting. People have different femur lengths, hip sockets and arm lengths that are all going to play a role in finding the most optimal deadlift position for them.
Some people aren’t qualified to pull conventional, but that doesn’t mean they can’t perform a kettlebell or trap bar deadlift. The ten tips above apply to any style of deadlift.
If you’re unsure about deadlifting or may think your technique is off – I’d suggest finding a coach who can give you a breakdown of your deadlift and can provide a detailed assessment. Also, I’d suggest familiarizing yourself with the world of powerlifting and Dr. Stuart McGill’s work – you will learn a lot!
Cheers,
Remi
Thumbnail Image Licensed from “paiken/depositphotos.com”